
sumber: https://design.tutsplus.com/tutorials/how-to-creatively-customize-an-indesign-magazine-template–cms-26847
Magazine templates are a great foundation for making your own unique, creative designs. The sizing, pages, masters and basic elements are already set up for you, which means you can get stuck in with the fun part of the task—editing the template to suit the theme and style of your magazine.
In this tutorial, learn the simple process of how to make a magazine from an existing InDesign magazine template and create something that looks completely special and unique. I’ll also share some of my top tips for choosing templates and some handy InDesign techniques for making editing a much easier and more enjoyable process.
Let’s get stuck in!
1. Choosing Your InDesign Template
InDesign magazine templates come in a variety of sizes, styles and page length, and can range from a budget-friendly $2 for a simple cover template to $20 for a more complete magazine with upwards of 30 pages in length.
What Are the Advantages of Choosing a Ready-Made Template?
Well, magazines tend to be pretty lengthy, and as a result setting them up can be time-consuming and fiddly. You need to think about technical issues like page sizing, page numbering, masters and running headers.
A template will have this set up for you already, as well as have a professional-looking design theme which is ready to customize, with layouts, colors, graphics and typefaces that suit the style of the magazine, whether it’s for fashion, lifestyle, travel, news, technology, food or general interest.

The other advantage of using a magazine template is that the design will be already prepared for professional printing. The pages will conform to a standard size (make sure to check the page dimensions in the description of the template before you buy), and colors will be optimised as CMYK swatches for printing.
Aside from adding your information, all that’s left for you to do is to export the magazine to a print-ready format (see the final section of the tutorial, below), or simply provide the packaged InDesign file as a native file, for your printer to export to a format that conforms to their standards.

How Do I Know Which Template Is Right for Me?
You should pick a suitable template based on two main factors:
First, consider how you want your final magazine to be structured—do you want a contents page, different sections, more or fewer pages, etc. Some templates are more complex than others, with various master pages creating different page layout styles across the template. If you want your magazine to be simple, opt for a simple template, rather than trying to cut down a huge complicated design.
Secondly, you want to look for a template which is close in style to your final desired product. This might be based on the subject matter. For example, whittling down your options to templates tagged ‘fashion’ will be a good starting point for finding a suitable template for a fashion or lifestyle title. Or you might want to opt for style over subject matter. You can easily adapt a ‘minimal’ fashion magazine template to become a ‘minimal’ travel magazine. If you have a strong aesthetic goal in mind, this is the best way to go.
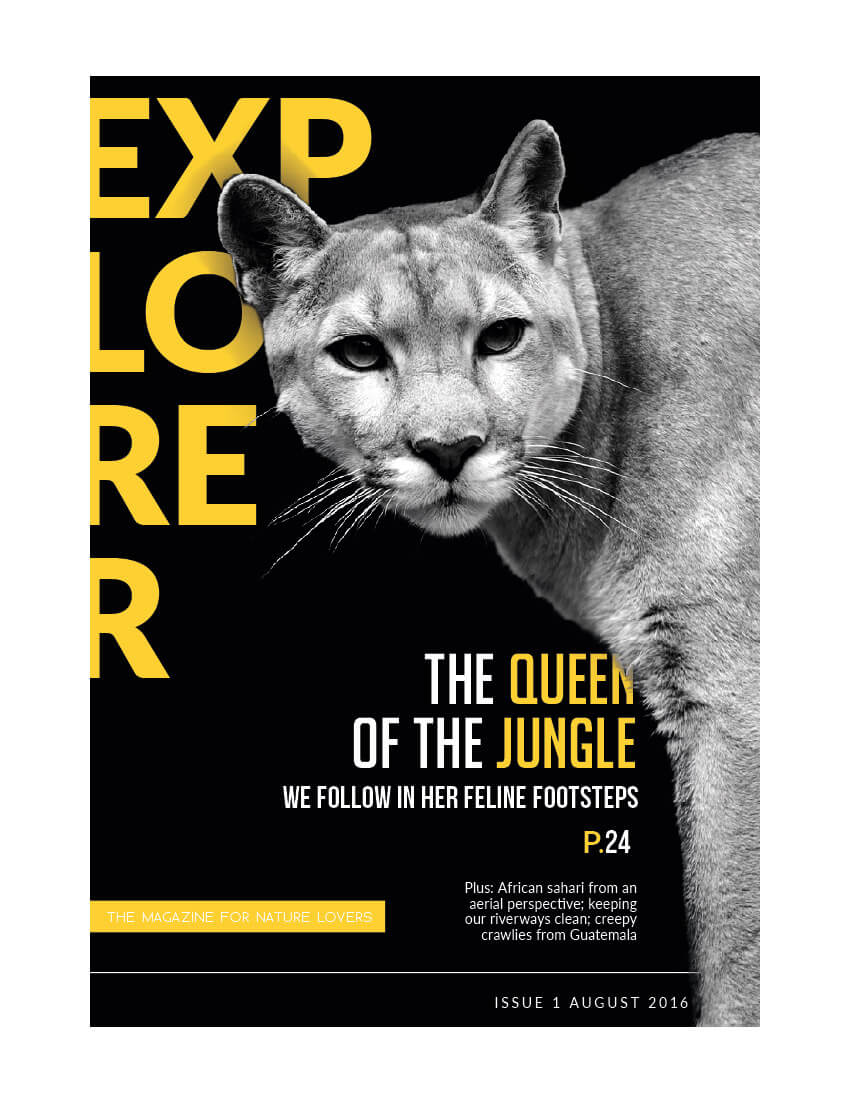
In this tutorial, I’ll show you how I edited this multipurpose magazine template to transform it into the first issue of ‘Explorer’ magazine, a nature and adventure publication.


In Section 2, below, I’ll walk you through the steps—you’ll be able to use the same method and techniques for editing your own magazine templates, regardless of which one you choose to work with.
Where Can I Download a Magazine Template?
Glad you asked! Envato Market is your go-to source for professional-grade, creative magazine templates. You’ll be sure to find something to suit your budget, style and subject matter. Templates are usually set up as Adobe InDesign files, so you’ll need to make sure you have access to the software before you download.

Also, if you need any extra help with getting your chosen template set up, the friendly folk over at Envato Studio are always on hand. Drop them an email to find an expert designer to help get you started.
2. Editing Your Magazine Template
You don’t need to feel creatively restricted when you download a ready-made template. Instead, see it as a foundation for building your own design. You’ll be amazed at how tweaking a few key design elements will transform your magazine into something unique and personal.
We’ll walk through the steps of how to create a magazine by editing this multipurpose template in three main stages:
- Color – editing swatches allow you to change large portions of color in an instant.
- Images – we’ll look at how splitting your images from their backgrounds can create an instant 3D effect that looks amazing on covers.
- Type – subtle tweaks to the fonts and text formatting can have a transformative effect and really change the personality of your design. We’ll also look at how to create your own type styles to carry formatting across your pages.
Ready to get started? If you’d like to follow along the steps here exactly as I do them you’ll need to download this multipurpose magazine template. Otherwise, pick a template of your own—you’ll be able to apply the same techniques to different templates too.
Step 1
Let’s start by downloading the InDesign template to start working with. Now navigate to the downloaded folder, and duplicate the InDesign file, naming the new one ‘…edited.indd’. This means that you can edit away to your heart’s content while keeping an intact copy of the original template (you never know when you might need it!).
You might find that the template folder also contains a text file with instructions about where to download the fonts used by the template designer. It’s best to get these fonts downloaded and installed before you open your InDesign file.

When you’re ready, open up the InDesign file in Adobe InDesign. You might need to open an IDML version of the file if you’re using a version of InDesign that differs to the original format of the template.
Take a brief tour of the template to familiarise yourself with what you’ve got to hand. Expand the Pagespanel (Window > Pages) to view the full range of pages.

Click on the Master page icons at the top of the Pages panel to see how the master pages have been set up. Here, I can see that there are two masters—one for the inside pages with page numbers, and one for the cover, without numbers.


Now that we know what we’re dealing with we can start to customize our template. Let’s start with color…
Step 2
Magazine templates tend to have a few elements that are consistent across the design. These consistencies determine the overall mood and look of the magazine, so by tweaking them you can really start to flex your creative muscles.
Color is the first thing you should look at editing. If your template uses a consistent color scheme, it’s super easy to change color across the whole design and give it a completely different flavor. Here’s how!
Scroll up to the cover of the magazine—this is the most sensible place to start editing your magazine as it will set the tone for the remaining pages.
Expand the Swatches panel (Window > Color > Swatches). Select one element, such as a text frame or shape, that features the main color that is used consistently across all the pages. Double-click on the highlighted swatch to open up the Swatch Options window.

Adjust the levels of Cyan, Magenta, Yellow and Black to create a new color swatch. Here I’ve gone for a bright, punchy yellow, C=1 M=17 Y=92 K=0.

Click OK. You’ll notice that all elements that had the old swatch color applied to them will now be in your new swatch.

Step 3
The next step for customizing your template is to select and edit images. Magazines are mainly image-based, so getting the style and mood of your photography and illustrations just right will help to set the tone of your whole publication.
One of the best techniques for giving your images extra ‘oomph’ is to create a 3D effect, allowing parts of a photo to cross in front or behind text. This works especially well for covers.
To do this you need to find a photo with a relatively solid background and strongly silhouetted subject. I’ve selected this dramatic image of a puma, in black and white.
You’ll need to open up the image in Adobe Photoshop, and minimize your InDesign window for now. In the Layers panel, duplicate the Background layer to create a copy of the image.

Step 4
Take the Lasso Tool (L) and draw a rough line around the edge of the photo’s subject, joining up the line so that the subject is enclosed.

Click on the Refine Edge button in the top Controls panel. Increase the Radius, and adjust the Shift Edgeslider to make the lasso fit snugly to the edges of the silhouette.
Use the Refine Radius Tool to brush over edges of the photo where you’d like the line to fit more snugly. Use the Erase Refinements Tool to get rid of any areas of the lasso that creep too far past the outline of the subject.


Zoom right into the photo to pick out any tricky areas that need further refining. These whiskers can be picked out using the Refine Radius Tool.


Step 5
When you’re happy with the lasso line, Control-C (Windows) or Command-C (Mac), and then Control-V (Windows) or Command-V (Mac) to copy and paste the selected shape onto a new layer.

Switch off the visibility of the two ‘Background’ layers sitting below, then go to File > Save As. Save the image as a Photoshop file with a new file name, such as ‘Puma_No BG.psd’.

Step 6
Return to your InDesign document.

On the front cover, select the image frame, and go to File > Place. Choose the original, unedited version of your chosen photo, which still has the background intact.
Select the Eyedropper Tool (I) and click once on the background of the photo to pick up the color.

Double-click on the Fill square at the bottom of the Tools panel to open up the Color Picker window. Set your cursor anywhere in the CMYK text boxes at the bottom right of the window, and then click Add CMYK Swatch. Click OK to exit the window.

Double-click inside the image frame and delete the photo. Adjust the Fill Color (from either the Swatchespanel or the top Controls panel) to the new swatch.

Edit > Copy the image frame and set the Fill Color to [None]. Right-Click (Windows) or Ctrl-Click (Mac) > Arrange > Bring to Front.

Now with this pasted image frame selected, File > Place your edited, background-free photo into the image frame.

Step 7
You can now shuffle the text frames around on the cover to improve the legibility of text sitting behind the image.

Try just allowing a hint of text to sit behind the image to create the 3D effect without effecting readability.
Step 8
Our cover’s looking great! You can really see how these subtle tweaks to color and image have made the design look distinct and differentiates it from the original template.

Now let’s move on to one of the inside spreads of the magazine, and see how we can customize that. The next main thing you can do to personalize a magazine template is to switch up typefaces and text formatting. The ‘voice’ of the magazine is its text, and as a result the font that the text is set in will give the words a distinct personality.
This spread has a strong minimal look at the moment, but we can give it a bit more personality by experimenting with the type styles.
First of all, make sure your colors and images are consistent with the cover to give the design a unified feel.


Like before when we took an overview of the template’s pages and masters, we should also check if the text in the template has any formatting already applied to it. Some of this is more obvious, such as the Font and Font Size (go to Window > Type & Tables > Character to view formatting settings)…

…but there might also be particular type ‘styles’ applied to different parts of text in the template. For example, if I click my cursor into this header text frame and open the Paragraph Styles panel (Window > Type & Tables > Paragraph), I can see that the header has a style called ‘base’ applied to it. The ‘+’ next to the style’s name indicates that the designer has tweaked the formatting of the style after applying it to make it completely suited to this layout.

What we can do is create new type styles of our own, to add to the list of styles and apply to other pages to help customize the template further…
Step 9
To create a new style you first need to format a sample piece of text, which can then be saved as a style and applied repeatedly to other items of text.
Here I’ve highlighted all the text in the header and switched the Font to Aleo, Light from the Characterpanel (Window > Type & Tables > Character).

I pull out a couple of words of the header in a yellow swatch, and adjust the Font Weight to Regular to bolden it.


Step 10
I highlight just the first part of the header which is set in Aleo, Light, and from the Paragraph Styles panel(Window > Type & Tables > Paragraph), I click on New Paragraph Style from the panel’s drop-down menu (find this at the top-right corner of the window).
I give the style a name (here, ‘New Header – Aleo’) and click OK. We can treat this as a new ‘base’ style, which will be consistently used, with some tweaks here and there, across multiple headers in our magazine.

I then highlight just the text set in the yellow Aleo, Regular. I choose New Character Style from the adjoining Character Styles panel.

This Character Style will be applied to individual letters or words within headers to create a decorative effect. I name this style ‘New Header – Aleo – Yellow’, so I’m able to recognize it in the styles list, then hit OK.

Step 11
Now I head over to a different spread of the magazine.


With the Paragraph Styles and Character Styles panels still open, I can highlight text on this spread and apply the ‘New Header – Aleo’ Paragraph Style.

A quick tweak to the text alignment from the Character panel and extending the text frame down gets the text looking suitable for this layout.

I can apply the Character Style to some of the text too. It may be that the style doesn’t completely suit the page, such as here where both the text and background are yellow.

But you can easily adjust the text further from the Character panel, using the Character Style as a basic foundation for the formatting.


3. Exporting Your Template for Printing
Here I’ve shown you how you can customize three main elements—color, images and type—of your template to create a unique design that’s tailored to the subject matter and style of your magazine.
Once you’ve customized all the pages of your design and fed your content into the pages, you should do a final spell check (Edit > Spelling > Check Spelling) and perform a Preflight (Window > Output > Preflight) to make sure that there is no over-running text, missing fonts or missing image links in your design.
Now you’re ready to export your magazine for printing. Read on to find out how…
Step 1
You should get in touch with your chosen printer before preparing your artwork for print, to check if they have any preferences for how the artwork is set up. It may be the case, for example, that they would want the front and back cover to be provided as a separate press-ready file, and be set up as a whole cover with a spine. This is not how this magazine template is set up so you may need to ask your printer to provide a suitable template for the cover if this is the case.
For the bulk of the magazine, you can export the design using this process. First, go to File > Export and choose Adobe PDF (Print) from the Format drop-down menu. Name the file something obvious, like‘Explorer Mag_Print-Ready.pdf’. Click Save.
In the Export Adobe PDF window that opens, choose [Press Quality] from the Adobe PDF Preset menu at the top of the window. Make sure that Pages, not Spreads, is checked, so that the magazine is exported as single pages, which is much more helpful for printers.

Step 2
Click on the Marks and Bleeds menu option to the left side of the window, and check All Printer’s Marks.
You can either check Use Document Bleed Settings to include the bleed on all sides, or, if your printer has requested as such, you can apply custom bleed settings and remove the bleed from the inside edge of the page (which will be invisible once the magazine is bound).

Click Export.

Congratulations! Your magazine is ready for sending straight off to the printers. Great work!

Make Your Own Customized Magazine Design
In this tutorial we’ve looked at how to make a magazine by creatively customizing an InDesign magazine template. Also, we learned how to make it look unique and perfectly suited to your magazine style and subject matter.
Templates shouldn’t be seen as restricting your creativity. On the contrary, they allow you to delve straight into the more fun aspects of designing magazine layouts.
Here we’ve looked at three main stages for editing your InDesign templates. This trio is a great starting point for creating a magazine design that’s completely personal to you. To recap, these are:
- Color – edit color swatches to allow you to change large portions of color instantly.
- Images – split images from their backgrounds to create a subtle 3D effect that looks amazing on covers and adds extra interest to photos.
- Type – make tweaks to fonts and the formatting of text to change the personality of your design. We also looked at how you can save Paragraph and Character Styles to carry formatting across the pages of your magazine.
Komentar Terbaru